Welcome back my fellow hackers! I was thinking recently, and came to the realization that we haven’t really been cooking up any homemade tools here at HackingLoops, so I’ve decided to change that. Today we’re going to be learning about SMTP user enumeration, as well as building an enumeration tool of our very own and taking things further than just using the python smtplib to send emails.
First, we’ll discuss the SMTP protocol, then we’ll follow it with the purposes and potential of this enumeration. Once we’ve covered that, we’ll discuss the methods that we can use to enumerate these users and test smtp. After all that is said and done, we’ll start constructing our own script. So, let’s get started!
The SMTP Protocol and User Enumeration
What is SMTP?
SMTP, short for Simple Mail Transfer Protocol, defines the standards used to transmit e-mail between systems. SMTP is not only used by mail servers for relaying messages to one-another, it is also used by the e-mail client of the end-user in order to transmit a message to the mail server for further relaying.
What is SMTP User Enumeration?
These SMTP servers have users registered on them, and these users have e-mail addresses. By sending probes to the server in the form of certain commands, we can tell if a given user exists. By repeating this process again and again with a list of varying usernames we may be able to identify a multitude of users or e-mail address on the target server. By verifying the existence of these users, we can then proceed to send out phishing attacks directly targeted at them.
How Does SMTP User Enumeration Work?
There are 3 commands in the SMTP protocol that we can use to enumerate a user: VRFY, EXPN, and RCPT TO. The VRFY command is short for verify, and is actually mean’t to validate usernames and addresses. Because of its innate purpose, many administrators disable the VRFY command to stop spammers. The EXPN is very similar to the VRFY command and doesn’t really require extra explaining.
The RCPT TO method is different however. First, we need to discuss the MAIL FROM command. This command identifies the source address of an e-mail being sent. Once we send a MAIL FROM command, we use RCPT TO method to identify the recipients of the e-mail. By repeating RCPT TO commands after the MAIL FROM command, and never actually finishing the started e-mail, we can identify the existence of any user we’d like. Now that we understand SMTP and SMTP user enumeration, let’s get started on building our script!
(Note: the script can be found here on Pastebin. The screenshots here do not have comments, but the Pastebin post does, so I suggest you keep it open and reference it while we go through it here.)
Building the Enumeration Script
Step 1: Beginning the Script and Initializing Class
In order to keep this simple, all our functions will be housed under a single class. Once we’ve completed these functions, we will be able to create an instance of this class and execute the functions as we need. In this step we are first going to set our interpreter path, import a module we’ll need, and initialize our class:

As you can see, we only need a single module at this point, socket. The socket module will allow us to create and utilize network connections. Our class also takes a number of arguments, these being: the target IP address, the file containing usernames to try, the port number to connect to on the target, a scan type, and an address to use if a MAIL FROM command is required (RCPT method). Also, two empty self attributes are created, self.sock will later contain the socket object that connects to the target and self.targetBanner will store the banner from the target server when we connect for the first time.
Step 2: Function to Read List of Users
Next up, we’ll be creating the function that will read the file containing the list of usernames supplied when the object was created. In our init function, we stored the path to the file in self.userlist. Using this, we can read and parse the file, after which we can store the new list in self.userlist, replacing the file path:

Since this function won’t be executed till later, our list of users will remain un-read until we call it. Once it’s called however, the list will be read and stored.
Step 3: Function for Constructing and Handling Sockets
Naturally with a script like this, we’ll be using sockets in order to make and use the connection(s) to the target server. In order to ease the implementation of these sockets, we’ll be building a pair of functions to handle their creation:
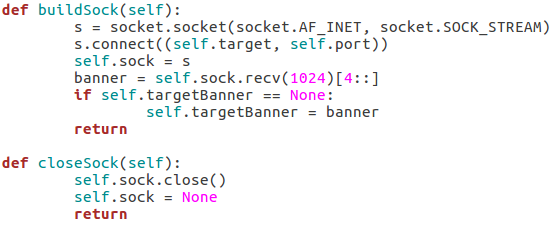
Our first function, buildSock(), follows these steps: create the socket object, connect the socket to the target IP address on the target port number, store this connected socket object in self.sock, receive the server banner, and store the server banner in self.targetBanner (if it hasn’t already been stored there). The closeSock() function is simple and not really necessary, but it does save us from repeating some lines of code later. It simply closes the socket object in self.sock and resets its value to None.
Step 4: Function for Checking Vulnerability to Scan
This function will read the type of scan that was chosen and test the target server to make sure that it’s vulnerable before the enumeration begins. We can do this by attempting to use these commands:
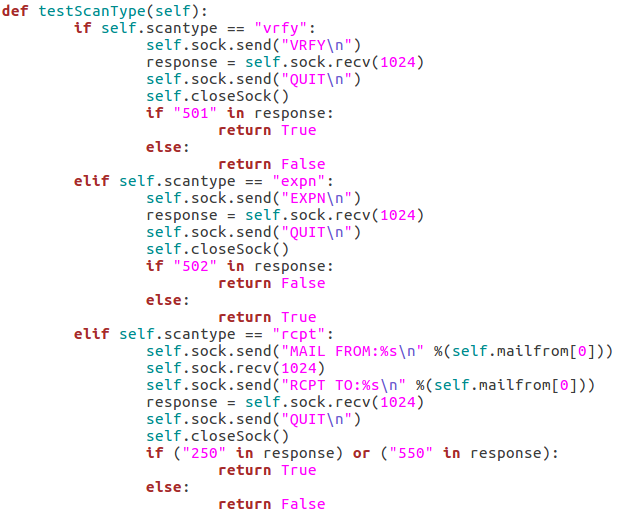
The first test is the VRFY test, which will send an empty VRFY command to the target. If the target responds with 501 (the SMTP reply code for a syntax error), then the VRFY command is available to be used. The second test will check for vulnerability to the EXPN method. This can be accomplished by sending an empty EXPN command, and if the target responds with a 502 (command not recognized) then the EXPN command will not work. The final test is for the RCPT command. We start by sending our MAIL FROM command containing the given/default username. We then send an RCPT TO command targeted at the same user. If the target responds with 250 or 550 (OK or user unknown) then the RCPT TO method is available for use.
Step 5: Functions to Probe Target for Username
These next four functions will all be related to probing the target for a given username. I’ll go ahead and throw up the screenshots, then we’ll discuss them:
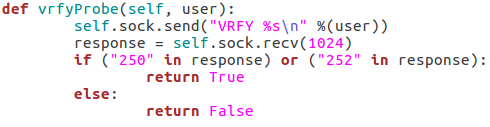
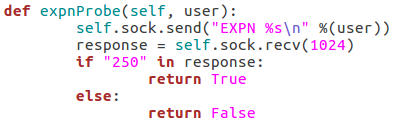
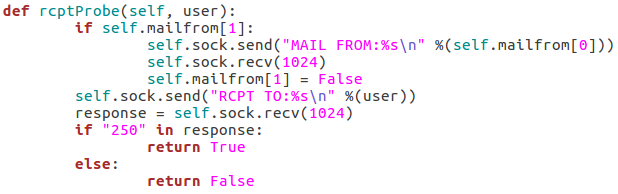
These three functions all behave similarly to each-other and to the function for checking the targets vulnerability to the scan type. The commands are repeated as they were before, but this time we add the username we’d like to enumerate to the command. If the target responds to this with 250(OK) then this means that user exists (252 is also an acceptable value for the VRFY method). Finally, we have this function:
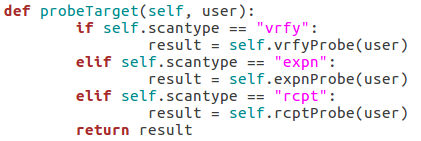
This function simply parses the string that was supplied as the scan type when the class is created and probes the target for a given username using that probe method. This will allow us to supply usernames to a single function while still probing the target using the proper method.
Step 6: Taking and Parsing Arguments
Now that all of our functions are complete, we can start putting together the body of our script. First, we’ll import some other modules and then we’ll set up and parse the arguments for the script:
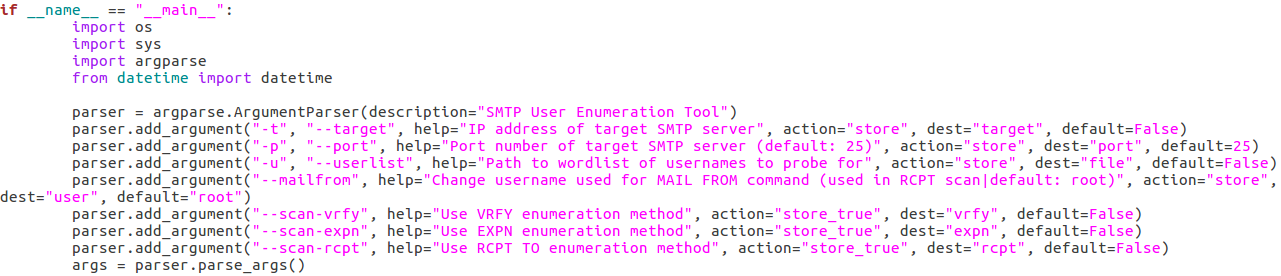 Here we can see that we have seven arguments available when using this script. Firstly, we have the target IP address and port number, then there’s the file path to the word-list containing the usernames to probe for. There is also a switch for each scan type (one of which must be supplied) and finally there is an optional flag to specify the username/e-mail address to use with the RCPT TO method.
Step 7: Detecting and Reporting Bad Input
A big problem in scripting is that invalid user input can really gum up the works. The easiest way I’ve found to combat invalid input, is to make sure you never get invalid input. We can do this by running a series of checks to make sure everything is in order before we continue. First, we’ll validate the target IP address:
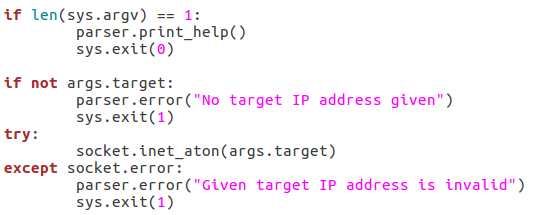
We start by checking to see if a target has even been supplied. If it hasn’t, we can raise an error through the parser to tell the user that one is required. If an address is given, we can run it through the socket.inet_aton function, which will raise an error if the IP address is invalid. Now that we’ve handled the validation of the target IP, we should move on to validating the port number:
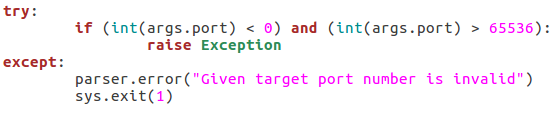
This block of the code will check that the given port number is in the correct range of integers, if it is not, an exception is raised, and the port number is reported as invalid. The try/except block will also give this report if the int() function raises an error (a non-integer value being given). Next up we’ll check that the path for the word list is in order:
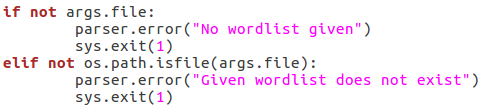
First, we make sure that a file path was given. If a file path was given, we use the os.path.isfilefunction to evaluate whether or not the file actually exists. If an existent file path was given and the checks are passed, nothing happens. Next up, we will be verifying the chosen scan type:

First, we pull all the scan type values out of the arguments and put them in a list. We then use an ifstatement to say this: if there is more than one true value or zero true values, return an error. This will allow us to filter out invalid scan type input. Now that all our checks have been completed, we can move on to executing the enumeration.
Step 8: Performing Enumeration
Now that we’re starting our enumeration, we need to create an instance of our SMTPUserEnumerator and pass all the arguments we received:

The if/elif block simply identifies the type of scan that was chosen and stores that value in scantype. Also, before we construct the enumerator object, we print back to the user: the chosen scan type, the target IP, and the target port number. Now that we have our enumerator object, we can run the testScanType() function in order to validate the targets vulnerability before we continue:
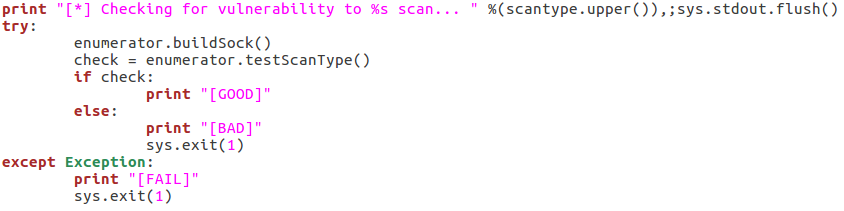
As you can see here there are three possible responses to the vulnerability check: good, bad, and fail. A good result means that the checking function returned true, a bad result is returned for false. Also, if an error is generated, the check is reported as a failure and the script exits. Now that we’ve checked the target, we can parse the list of usernames:

This is fairly self explanatory; we print that we’re parsing the list of users, then call the readUsers()function on our enumerator object. Should this process fail, the script will say so and exit. Once the usernames are read we can move on to the actual enumeration:
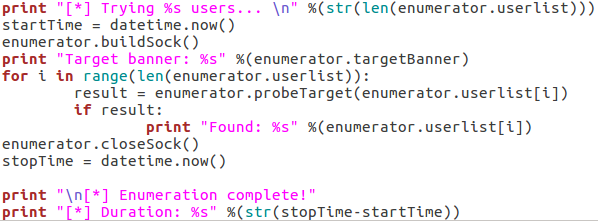
We start our final code block by printing how many usernames we need to try. Once we’ve done that, we use datetime.now() to start the clock for tracking the duration of the scan. We then call buildSock() to re-connect to the target and print the targets SMTP server banner. We then loop through the list of usernames and call the probeTarget() function for each of them. If a username is reported as good, we print it and move on.
Once the enumeration is complete, we call the closeSock() function and stop the clock for the duration. We then print that the scan is complete and print the difference between the two time values we took (resulting in the elapsed time from start to stop). Now that our script is complete, there’s only one thing left to do!
Step 9: Test the Script
We’ll be testing our script against a Postfix ESMTP server running on an Ubuntu Server 16.04 LTS VM. We’ll start by using the –help flag in order to print the help page for our script (it is automatically generated with argparse):
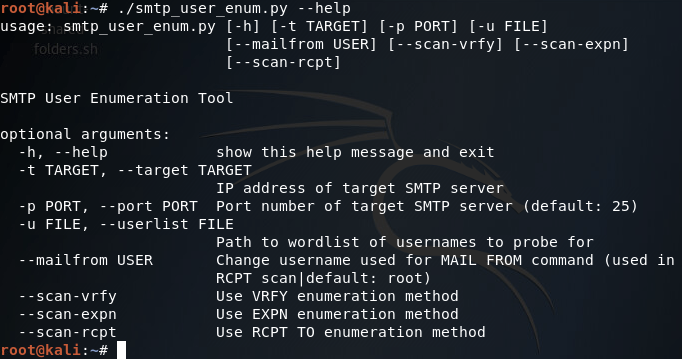
Our help page is looking good! Before we continue with this enumeration however we’ll need to build a small list of usernames. I’ll be using the cat command in the Kali CLI for this purpose:
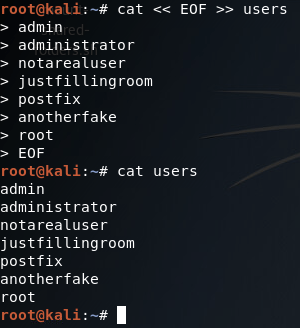
Alright, now we’ve got our list of usernames stored under a file named users. Now that we’ve got that squared away, we can begin testing our different scan types, of which we’ll be starting with the VRFY method:
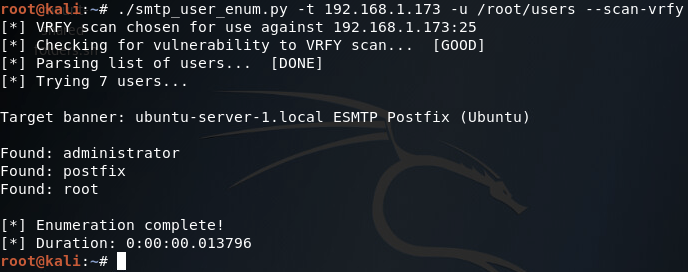
There we go! Our script works! Now let’s move on and test the EXPN scan method:

Our script tells us here that this target is not vulnerable to this type of scan method, which is true (I tried it manually with a telnet session and the command is unrecognized). Finally, we have our RCPT TO method:
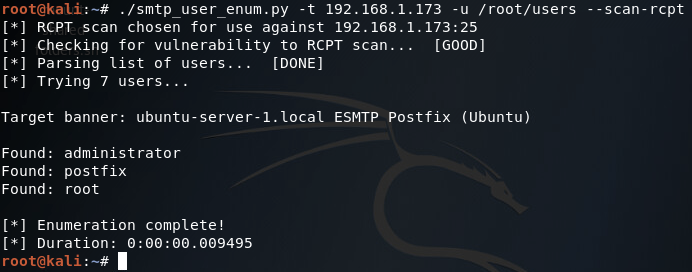
There it is, two of our three scan methods work on this target. Hopefully this helped you learn more about SMTP user enumeration (it definitely helped me), and you can expect to see more home-cooked scripts in the near future!
(Note: just in case you missed the link earlier, the script can be found here.)


0 comments:
Post a Comment